A practical paragliding exercise that almost no school promotes
What is the real goal of this exercise? I’ll reveal it if you stay until the end. Meanwhile, in the accompanying video you’ll see exactly how to practice it safely and effectively.
Why practice wing control without a harness?
Controlling the wing without a harness is much more than just “playing” with the paraglider on the ground: it’s a teaching tool to improve wind reading, precision, and takeoff preparation. In the video I show you step by step how to set up the area, what conditions to look for, and how to position yourself to get the most out of it.
Safety first
- Helmet whenever you are not fully confident in what you are doing.
- Clear ground: no obstacles, cables, or traffic.
- Gentle conditions: avoid gusty winds, thermals, or any chance of being lifted.
- Smaller wing if possible: less tiring and more forgiving of mistakes.
In the video you can see this clearly.
Key benefits (and why they matter)
- Wind reading: if you don’t have an anemometer or windsock, raising the wing without a harness is a quick way to “feel” intensity and direction. (In the video you’ll see how I check this in seconds).
- Takeoff preparation: arranging lines, orienting the wing, and leaving everything ready. (In the video I show how I set up the gear to save time).
- Precision under the canopy: control without a harness forces you to refine posture, hand use, and timing. (In the video you’ll see how I correct common drift and misalignment).
Riser handling methods (with examples in the video)
Here are the three methods I use. In the video you can see “how” each one works, with close-up shots of the hands:
1) Attachment points
Holding the risers directly at the attachment points.
- Pros: simple for keeping the wing up and working on centering.
- Cons: not very efficient for raising it from the ground.
- Technical tip: pull the riser on the higher side to level; release if there’s too much pressure; wrists forward/back for micro speed adjustments.
2) “A” in dominant hand + rears in the other
Strong hand on the A risers; the other hand on the rears at brake pulley height.
- Pros: excellent for raising the wing; feels closer to a real takeoff.
- Cons: the A hand tires quickly; requires more coordination (rears must move to the opposite side of where the wing rises).
- Ideal use: placing the wing in takeoff position and practicing clean braking. (In the video I show how to balance effort and avoid “over-commanding”).
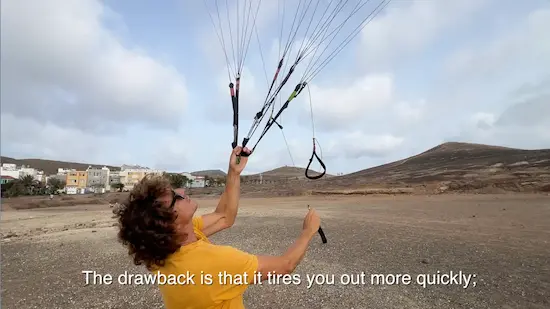
3) Two “A” in one hand + other at attachment points
With one hand you hold both “A” risers and the other hand goes to the attachment points. Once the wing comes up, release the “A” risers and that hand is free to operate the brake as needed.
- Pros: very useful for killing the wing with control; offers great braking margin.
- Cons: faster fatigue; switch hands to balance.
(In the video you’ll see how to switch smoothly without losing symmetry).
Risks, incidents and how to mitigate them
There have been reports of riser tangles (even fatal ones). I haven’t seen them myself, but they can happen. That’s why:
- Check that nothing can snag.
- Maintain active supervision if teaching students.
- Stop the exercise if there’s drift or gusts.
In the video I share how to release the wing safely.
Frequent mistakes (and corrections shown in the video)
- Looking at the wing all the time → Fix: alternate looking at the wing and your surroundings.
- Overcorrecting with your hands → Fix: use micro inputs and wait for the wing’s response.
- Passive stance → Fix: active feet, level shoulders, body under the wing.
- Obsession with lifting → Fix: prioritize symmetry and centering over height.
(Corrections are shown in the video, with slow-motion replays).
Myths about controlling the wing without a harness
It’s common to hear that this exercise might create wrong muscle memory, or that since it doesn’t exactly replicate flight it’s useless. Nothing could be further from the truth. First, the body learns to lower the hand on the higher side, which is exactly what we must do when using a harness, while also training the ability to stay under the center of the wing. And that is precisely what we want the body to memorize. The intensity of the movements is easy to adjust once the brain has internalized the rest.
As for supposed uselessness, the answer is clear: this exercise is very helpful for centering and understanding which side of the wing is flying more. Far from being pointless, it’s an effective resource for progressing in paraglider control.
When to practice and for how long?
- Ideal window: laminar wind, light to moderate (avoid strong thermic hours).
- Short sessions: 15–25 min blocks to avoid degrading technique due to fatigue.
- Progression: Ideally start with a small wing and increase difficulty only once you control drift.
So… what’s the main goal?
Here’s the answer I promised at the beginning: the main goal of control without a harness is to learn to stay centered under the wing. Everything else —reading the wind, preparing for takeoff, braking precisely— serves that purpose. If you master centering, your takeoff and ground control improve immediately.
Conclusion
Controlling the wing without a harness is a learning accelerator. Practice it with focus, suitable conditions, and safety measures. And remember: this post summarizes the “what” and the “why”; the video teaches you the “how” with practical examples, close-up angles, and typical corrections.
Want to learn paragliding or take a course to improve your skills?
Check out our flight courses.
Don’t forget to subscribe to my YOUTUBE channel
FAQ Wing control without a harness
1) What is the main goal of this exercise?
Learning to stay centered under the wing. That centering improves control, takeoff, and safety.
2) Is it safe to practice without a harness?
Yes, if you apply everything shown in our video. There I show how I prepare the environment and when to stop.
3) How does it help me read the wind?
By raising the wing you quickly identify intensity and direction. In the video you’ll see how I confirm the reading with small adjustments.
4) Which riser method should I use?
Depends on the goal: attachment points for centering, “A + rears” for raising and placing, and the third method for killing with margin. In the video I compare how each is done.
5) What are the risks and how to reduce them?
Possible tangles and drift with gusts or thermals. Reduce them with prior inspection, supervision, and clear limits. In the video I show how to stop in time.